AccountSight users can synchronize AccountSight expense data for their employees and time & expense data contractors with QuickBooks Desktop and QuickBooks Online as vendor bills. Bills can be paid to employees and contractor/vendors via QuickBooks directly in order to maintain accounting information accurately.
Here are the steps to transfer your expense sheet data to QuickBooks:
- Integrate your AccountSight account with QuickBooks
- Complete your QuickBooks expenses mapping under Settings > Integrations > QuickBooks Desktop > Expense and Cost Mapping
- Export expense and cost data in CSV format from your AccountSight report (Reports > Expense > Expense Report and Cost report under Report > Cost tab) . CSV file contains converted values in case of custom mapping for QuickBooks.
Follow the steps below to export expense data from AccountSight to QuickBooks:
Step 1) Follow the instructions and install the QuickBooks ASync utility.
Step 2) AccountSight Expense Data Mapping with QuickBooks Bills
The following are the default field mapping to export data from AccountSight to QuickBooks:
- AccountSight Customer Name same as QuickBooks Customer Name
- AccountSight Project Name same as QuickBooks Job Name
- AccountSight Category Name same as QuickBooks Account Name
- AccountSight Employee/Contractor/Vendor Name same as QuickBooks Employee/Contractor/Vendor Name
- AccountSight Payment Term Name same as QuickBooks Payment Term Name
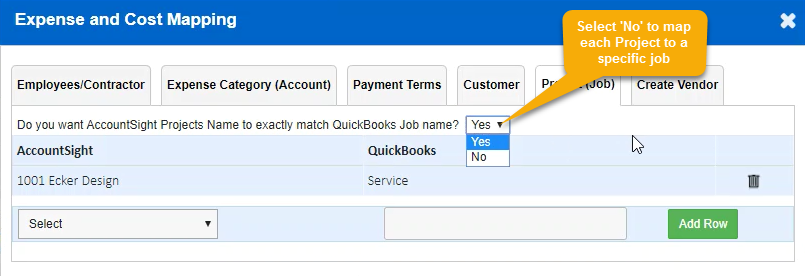
You can update the default mapping to No on mapping option ‘Do you want AccountSight XXXXX Name to exactly match QuickBooks XXXXXX?’ under each tab (Employee/Contractor, Expense Category (Account), Task/Payroll Item, Customer and Project) to enable your custom mapping.
| Mapping | Options |
|---|---|
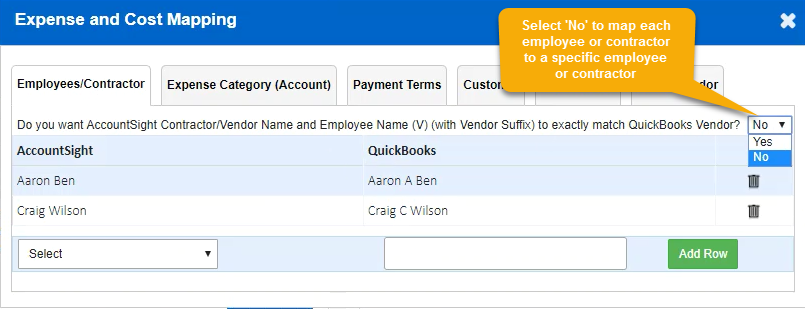
| Employee/Contractor | 1. Default value ‘Yes’ for option ‘Do you want AccountSight Contractor/Vendor Name and Employee Name (V) (with Vendor Suffix) to exactly match QuickBooks Vendor?’ will require each Employee Name setup with Employee Name(V) with Vendor Suffix and contractor/vendor names in QuickBooks be setup with exactly same name as AccountSight.
2. If your default option setup option as No, you can map each employee or contractor/vendor to a specific employee or contractor/vendor.
Note: If you don’t add a mapping for any employee or contract, their name will be used ‘as- is’ while exporting to QuickBooks from AccountSight.
|
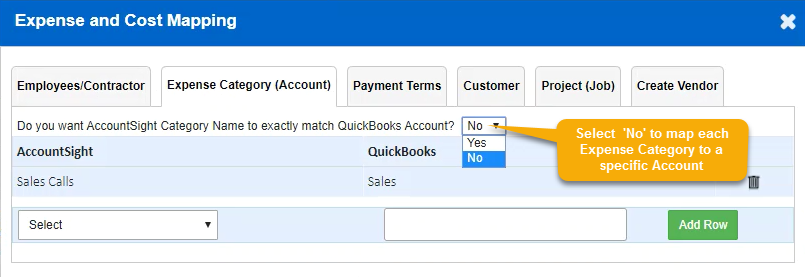
| Expense Category (Account) | 1. Default value ‘Yes’ for option ‘Do you want AccountSight Category Name to exactly match QuickBooks Account?’ will require each AccountSight Category be setup with exactly the same name as Account in QuickBooks.
2. If you setup this option as No, you can map each Category to a specific Account in QuickBooks.
Note: If you don’t add a mapping for any Tasks (Service Items), those names will be used ‘as- is’ while exporting to QuickBooks from AccountSight.
|
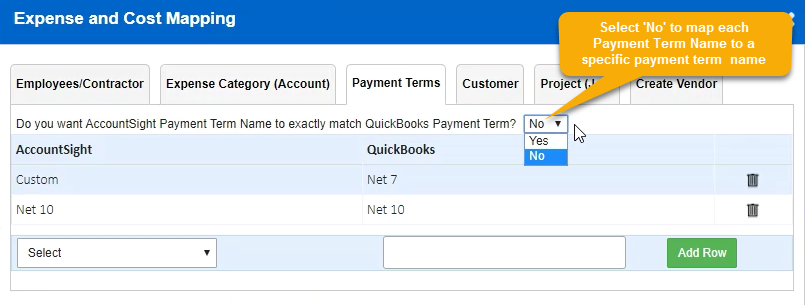
| Payment Terms | 1. Default value ‘Yes’ for option ‘Do you want AccountSight Payment Term Name to exactly match QuickBooks Payment Term?’ will require each Payment Term in QuickBooks be setup with exactly the same name as AccountSight.
2. If you setup this option as No, you can map each Payment Term to a specific Payment Term in QuickBooks.
|
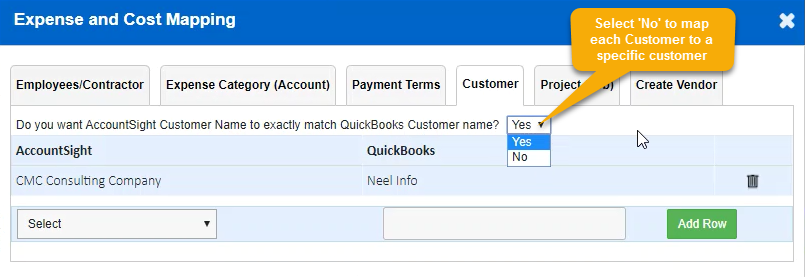
| Customer | 1. Default Option ‘Yes’ for ‘Do you want AccountSight Customer Name to exactly match QuickBooks Customer name?’ will require each Customer in QuickBooks be setup with same name as AccountSight.
2. If you select No option for ‘Do you want AccountSight Customer Name to exactly match QuickBooks Customer name?’, you can map each Customer to a specific customer.
Note: If you don’t add a mapping for any Customer, those name will be used ‘as- is’ while exporting to QuickBooks from AccountSight.
|
| Project (Job) | 1. Selecting default Option as ‘Yes’ for ‘ Do you want AccountSight Projects Name to exactly match QuickBooks Job name? will require each job in QuickBooks be setup with same name as AccountSight.
2. If you setup option as No, you can map each Project to a specific job.
Note: If you don’t add a mapping for any Project, those name will be used ‘as- is’ while exporting from AccountSight to QuickBooks.
|
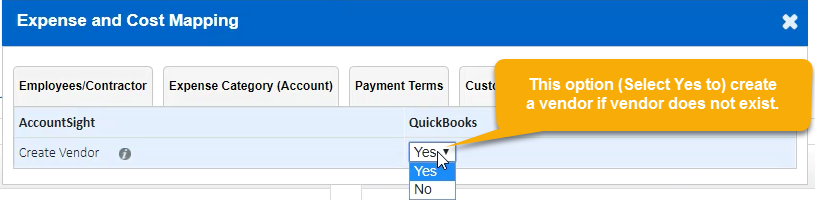
| Create Vendor | 1. Default value ‘Yes’ for option ‘Create Vendor?’ This option creates a vendor if vendor doesn’t exist.
2. If you setup option as No, will require each vendor in QuickBooks be setup with same name as AccountSight.
|
Step 3) Process to Export AccountSight Expense sheet Data to QuickBooks Bills
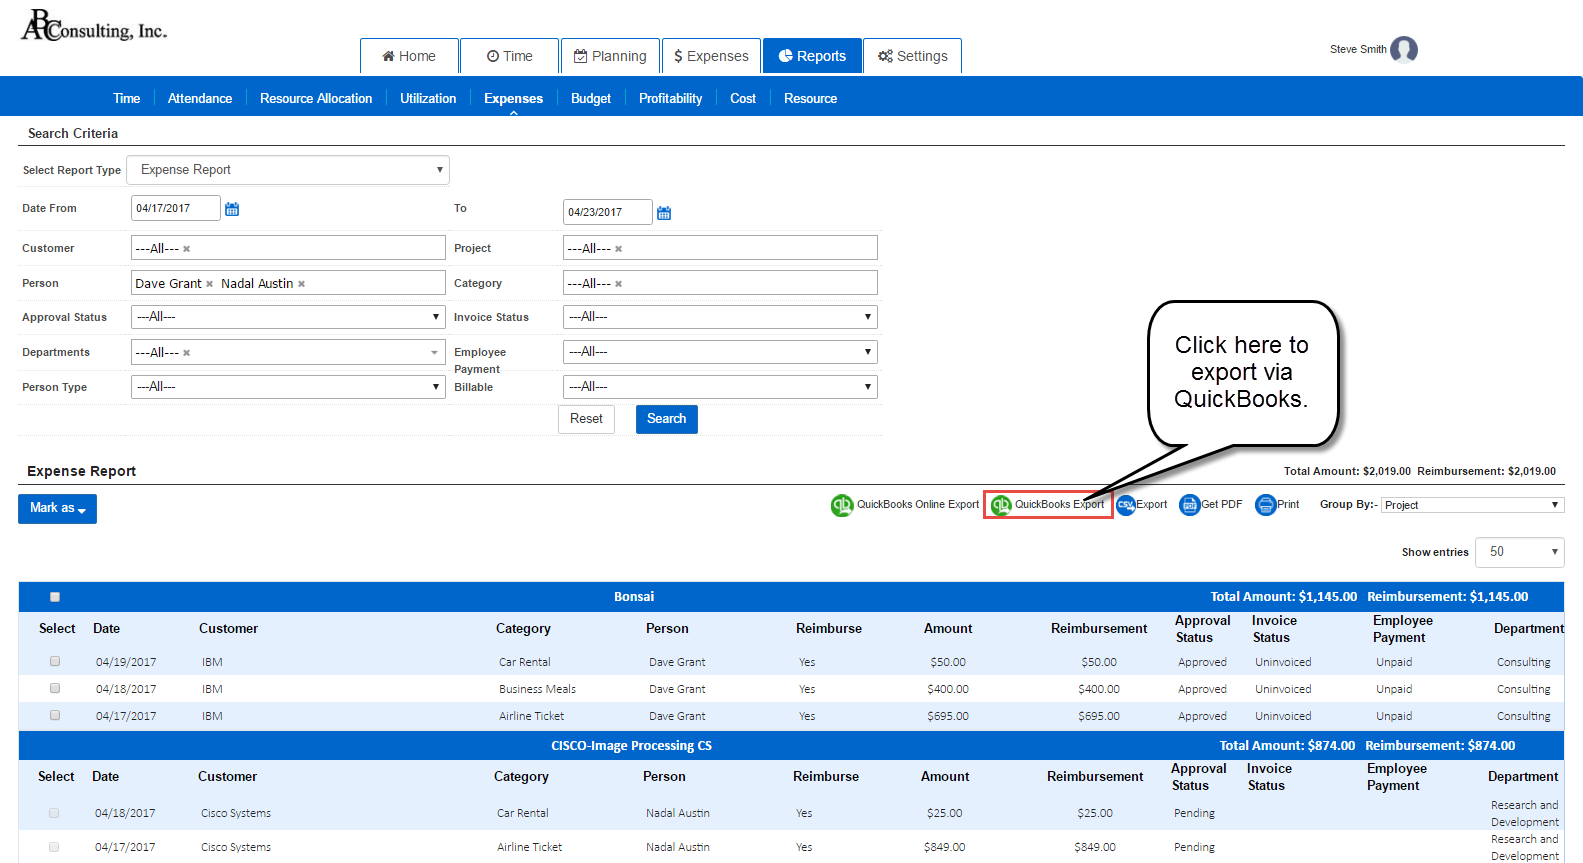
1) Login to your AccountSight account as the admin. Go to Reports -> Expense tab. Use the filters to choose the Customer, Project, Task and other options. Click on the QuickBooks Export button to save the filtered data in proper CSV format.
2) Open the ASync icon installed in your machine. Enter your AccountSight credentials and login. The UI will appear on your screen as shown below:
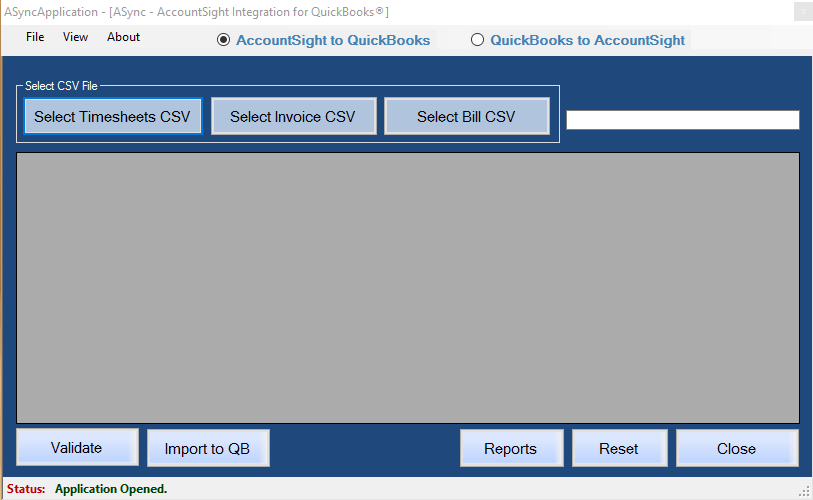
To import expense data to QuickBooks, first click on the Select Bill CSV button on the ASync UI and then browse and select your previously saved CSV file containing the weekly expense data. The data from the CSV file will appear on the UI screen:
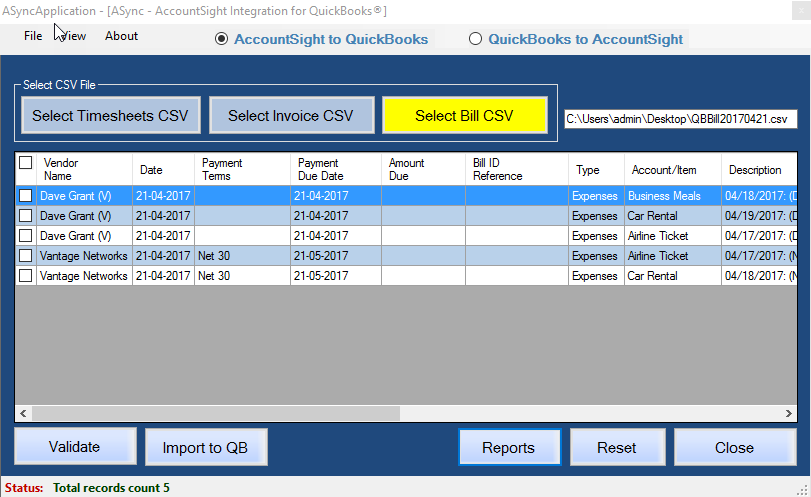
On the bottom left of the ASync UI, there are two buttons: Validate and Import to QB. Validate button can be used to just validate the selected data, to check if there is any error in the data.
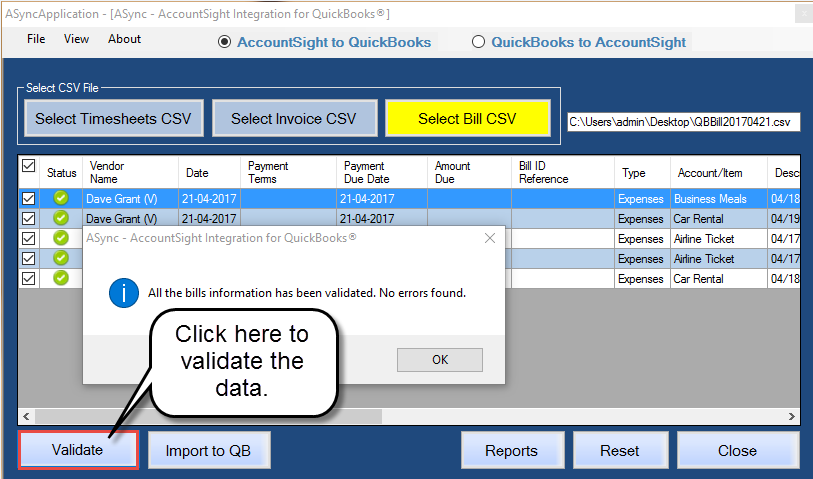
Import to QB button is used for both validations and import.

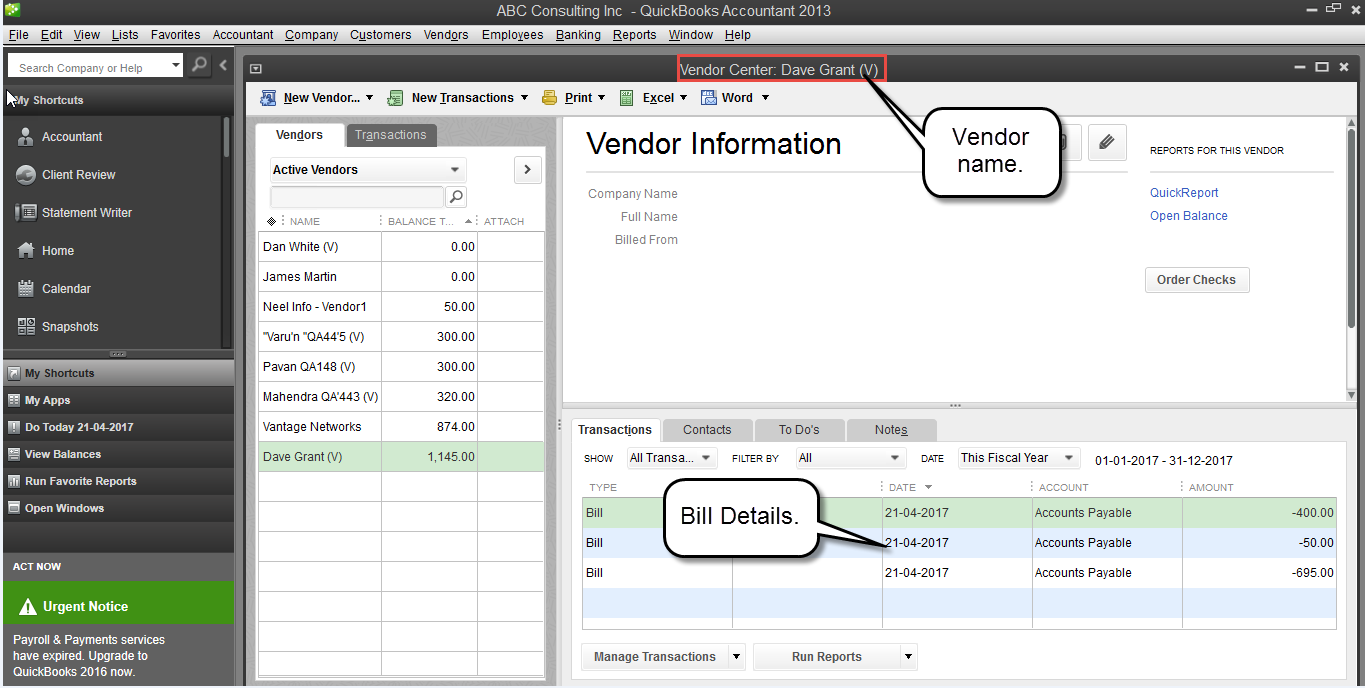
Now you can check in your QuickBooks UI that all the expense data from the CSV file has been successfully imported there.
The Reports button on the bottom of the ASync UI provides users the reports on the uploaded bills. It gives information about the application log and the error log.
Related Pages:
Integrate AccountSight with QuickBooks
Time Tracking Integration with QuickBooks Timesheet and Payroll
Export Invoice data from AccountSight to QuickBooks Invoices